
Loxone is a simple solution for smart control and automation of many types of projects: from individual devices to smart homes as well as large buildings and commercial premises.
With Loxone, the smart power sockets can be directly and easily controlled. The installation is simple and requires no programming or electrical skills.
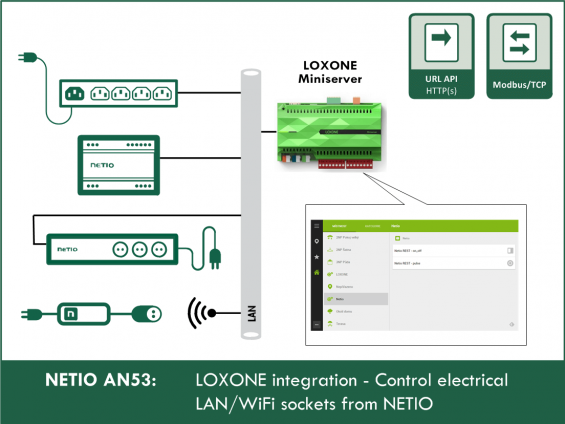
NETIO Application Note AN53 shows how to connect NETIO smart sockets to Loxone using various protocols.
With NETIO smart sockets, Loxone can:
- Switch any socket on or off with a push button or from the Loxone app.
- Toggle the state of any socket
- Power-cycle (Short Off) a specified socket with the push of a button
Compatible NETIO devices
- NETIO PowerCable REST 101x
- NETIO PowerCable Modbus 101x
- NETIO PowerPDU 4C
- NETIO PowerPDU 4PS
- NETIO PowerPDU 8QS
- NETIO PowerDIN 4PZ
- NETIO PowerBOX 3Px
- NETIO PowerBOX 4Kx
- NETIO 4
- NETIO 4All

This AN53 covers the following:
- Connection and control using URL-API (REST)
- Connection and control using Modbus/TCP

Connecting NETIO sockets to Loxone using URL-API (REST)
This connection method can be used with:
- NETIO PowerCable REST 101x
- NETIO PowerPDU 4C
- NETIO PowerPDU 4PS
- NETIO PowerDIN 4PZ
- NETIO PowerBOX 3Px
- NETIO 4
- NETIO 4All
The REST protocol essentially involves accessing a URL and processing the reply. REST request types include GET (same as entering a URL into a browser address bar), POST (same as submitting a web form), as well as more specific PUT/DELETE/PATCH requests used to modify data.
For our purposes, GET requests are sufficient since NETIO socket states can be set directly with a REST URL in this format: http://IP_ADDRESS/netio.cgi?pass=password&output1=3&delay1=2000 In order to use JSON or XML instead of URLs, a POST request would be used to submit a JSON file with the corresponding instruction to http://IP_ADDRESS/netio.json. However, Loxone support for JSON or XML is not that great, so it is easier to use the much simpler URL protocol.
This is what we want to achieve in this example. In addition to the switch to turn the smart socket on or off, there is a push button that turns the socket on for 2 seconds and then turns it back off.

Basic configuration of NETIO sockets – URL-API
Configure the NETIO device using its web interface:
Enable the URL-API protocol
- LEFT MENU: M2M API Protocols
- Check „Enable URL-API”
- Check „Enable READ-WRITE”
- Enter the password – this example uses “heslo”
- Save changes

Loxone Config with URL-API
First, in Loxone Config, add a “Virtual Output”. Give it a name, such as NetioREST, and assign it the address of the NETIO socket device, such as http://192.168.1.98 (do not end the address with a slash).

Then, add a “Virtual output command” to the newly created virtual output. Give it a name, such as OnOff, and fill in the “Command for ON” and “Command for OFF” (must start with a slash). The ON/OFF commands have the following format: /netio.cgi?pass=Heslo&output_OUTPUT_NO=OUTPUT_STATE
(for reference, see the detailed URL-API documentation)

In addition to the on/off command, let us add another command to switch the socket on for 2 seconds only. To do that, the output state is set to 3 and the “delay” parameter is added. So, add another “virtual output command”, give it a name, such as “Pulse”, and use the following “Command for ON”: /netio.cgi?pass=heslo&output1=3&delay1=2000. In this case, there is no “Command for OFF” since the socket switches off automatically.

These virtual commands can then be dragged to the Loxone diagram and connected to a push button and a switch. For the OnOff command, we leave the button in the “switch” mode, for the “Pulse” command, we set it to the “Push Button” mode.

This is what the actual switching with the switch or the push button looks like.

So, using REST API (URL-API) to control the device is not complicated at all.
Connection NETIO sockets to Loxone using Modbus/TCP
This connection method can be used with:
-
NETIO PowerCable Modbus 101x
- NETIO PowerPDU 4C
- NETIO PowerPDU 4PS
- NETIO PowerDIN 4PZ
- NETIO PowerBOX 3Px
- NETIO 4
- NETIO 4All
Modbus TCP/IP is a variant of the Modbus protocol that uses Ethernet (TCP protocol) instead of the traditional Modbus RTU over RS485 or RS232. With Loxone, it can be used for control without purchasing the Modbus extension.
Basic configuration of NETIO sockets – Modbus/TCP
Configure the NETIO device using its web interface:
Enable the Modbus/TCP protocol
- LEFT MENU: M2M API Protocols
- Check „Enable Modbus/TCP”
- Save changes


In order to communicate with a device over Modbus/TCP, it is necessary to know the addresses where the device expects commands or where its status can be accessed. For NETIO smart sockets, see this Modbus TCP/IP documentation. A detailed description of setting up Modbus Master is also provided as AN27.

Modbus Master uses the Wire Address for addressing. For example, to switch on the socket no. 1, the value of 1 needs to be written to the 101 address using the 0x05 – Write Single Coil function. To switch it off, the value of 0 is written to the same address.

After checking that the communication between Modbus Master and the device works, we can move to Loxone Config. It is recommended to always test the communication before configuring Loxone, in order to discover any problems as early as possible.
Loxone Config with Modbus/TCP
This is what we want to achieve in this example. A button to switch the outlet on or off via Modbus TCP/IP will be added to the Netio section.

Start by clicking “Miniserver Communication” in Loxone Config and then click the “Modbus Server” icon in the top menu. This creates a new Modbus server. Let’s name it “Netio Modbus”. As the address, set its IP address followed by a colon and the port number (502 by default).

Now add a “Modbus Device” to the newly created Modbus Server. Click “Sensors and actuators” and select “Modbus device”. Let’s call the device “NetioZasuvka”.

Third, insert a “Digital actuator” to the newly added Modbus device. “Digital” means that its values are only 0 or 1, while an “analog” one would allow to write any value to the target device.

The tree on the right (item 1) shows what should the configured Modbus device look like. Now we have our NetioModbus server with one NetioZasuvka device, which in turn has the OnOff digital actuator. This actuator can have any name. The I/O address is the address that we have tested in Modbus Master. The Command is 0x05 – Write single coil.

The Modbus communication is now configured. Now we can drag the actuator to the Loxone diagram, connect it to a push button, save the project to Loxone Miniserver and test everything.

So, control over Modbus TCP/IP is also not complicated at all. It is always a good idea to test the communication beforehand with Modbus Master (or any SW client for Modbus), and only then start configuring Loxone. After all, Loxone has its specifics and it is good to know that the device as well as the target ports work as expected, so any problems can be narrowed down to the settings in Loxone Config.

Source: https://www.vodnici.net/2020/05/, reproduced here with permission of the author
FAQ
1) Is it possible to secure the Modbus/TCP connection between Loxone and the NETIO smart socket device?
Partially. It is possible to define a range of allowed IP addresses (“Filter”) from which the NETIO socket device accepts Modbus/TCP connections. This can be configured in the web interface of the NETIO device under M2M API Protocols / Modbus/TCP / Enable IP filter.
2) Is it possible to use NETIO PowerCable MQTT with Loxone?
Yes. However, an app such as NodeRED is needed to “translate” MQTT to REST API. Unfortunately, Loxone does not support MQTT directly, so it is better to use PowerCable REST or PowerCable Modbus. For more information, see: https://www.vodnici.net/2020/05/jak-ovladat-mqtt-z-loxone/
3) Can I use NETIO Cloud together with the connection to Loxone?
Yes, NETIO Cloud can be used in parallel with M2M API protocols.
4) Can I use the NETIO Mobile / Mobile2 app together with Loxone?
Yes, the NETIO Mobile app can be used in parallel with M2M API protocols.
Supported FW versions of NETIO smart sockets
- PowerPDU 4C: firmware 3.3.1 or later
- PowerPDU 4PS: firmware 2.4.4 or later
- PowerBOX 3Px: firmware 2.4.4 or later
- PowerCable Modbus 101x: firmware 2.3.9 or later
- NETIO 4 and NETIO 4All: firmware 3.3.1 or later