
Supported devices:
About Flic2 smart button:
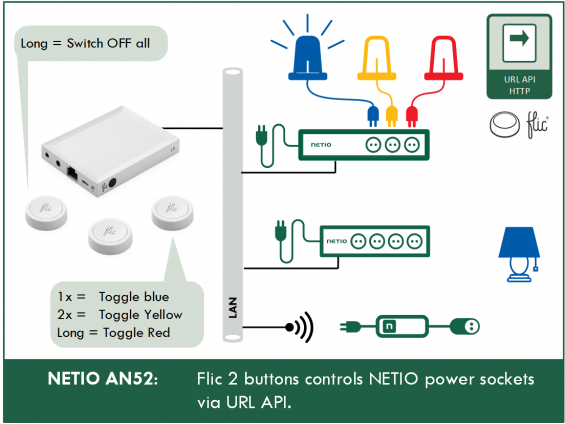
Svedish company Shortcut Labs is the creator of wireless smart buttons (Bluetooth) that offer physical recall of other functions in the physical world, as well as on mobile and other devices. Three different actions can be invoked from each button, and the LAN gateway can convert them to control one or more NETIO sockets.

Step 1 – Enabling URL API control in the NETIO device
Log in to the web interface of your NETIO product as a user authorized to change the settings (e.g. “admin”).
Go to M2M API Protocols and then URL API.
Check Enable URL API and enter your chosen password in the Password field. In this example, the password is “kolecko”. Click Save Changes to save the settings.

A warning is displayed saying that the activation of URL API deactivates the other M2M protocols. Click Confirm.

A green “Saved” message next to the “Save Change” button confirms that the settings were saved.
Step 2 – Toggling output 1 using a browser (a test of the URL API functionality and a description the URL API format)
Still at the M2M API Protocols -> URL API page of the NETIO device’s web interface, click the “Toggle Output 1” link. A new browser tab opens and output 1 changes its state.

The new browser tab will have the following URL:
http://[IP address of your device]/netio.cgi?pass=kolecko&output1=4
What do individual parts of the URL mean?
The http://[IP address of your device]/netio.cgi? part is fixed and we will not be touching it. We are interested in the parameters that follow.
The first parameter is the URL API password – in our case it is “kolecko”.
pass=kolecko
Individual parameters are separated by the ampersand (“&”) character.
The second parameter tells the device that output 1 should be toggled (if it was on, it is switched off; if it was off, it is switched on).
output1=4
How to change the parameter to toggle output no. 3?
output3=4
The entire URL API link would look like this:
http://[IP address of your device]/netio.cgi?pass=kolecko&output3=4
What if I simply want to simply switch the output on or off instead of toggling?
The action to take with the output is determined by the number after the ‘=’ sign.
0 – Switch off
1 – Switch on
2 – Briefly switch the output off
3 – Briefly switch the output on
4 – Toggle (if the output was off, it is switched on; if it was on, it is switched off)
5 – No action
So, how do I switch an output off?
Switching off output no. 1:
http://[IP address of your device]/netio.cgi?pass=kolecko&output1=0
Individual parameters can be listed in a sequence to control several outputs with a single call
Switching on outputs 1 and 3:
http://[IP address of your device]/netio.cgi?pass=kolecko&output1=1&output3=1
Before going on to configure FLIC, test the URL API and explore the possibilities by editing the URL
Step 3 – Configuring the FLIC button to toggle output1 whenever pressed
Prerequisites: The NETIO device is configured as described above. The FLIC hub is configured, the button is paired with the hub. The hub and the NETIO device are able to communicate with each other over the network.
Select your hub and then your button. Select the “Click” action. In the next menu, select the “Internet request” action.

Select the GET method and fill in the URL for toggling output 1 as in the example above. Make sure you have tested the URL in your browser:
http://[IP address of your device]/netio.cgi?pass=kolecko&output1=4
Confirm by clicking “SAVE ACTION”.

Before trying the button, first test the action directly in the application. Click the three dots next to “Internet Request” and select “Execute”. If everything is correct, the output is toggled

If the “Execute” action worked, now it is time to press the FLIC button. The same thing should happen again.
It is possible to assign more actions to the button. This way, it is possible to control more outputs, even at multiple devices, with a single touch of the button.
It is also possible to control devices that are only accessible over the Internet (actions are not limited to devices in the local network).
Step 4 (optional) – Toggling two outputs of a local device and an output of a remote device
First, construct the URL for the local device and test it in your browser. For the local device, list the parameter in sequence, specifying the command for output 4 after the command for output 1. The resulting URL looks like this:
http://[IP address of your device]/netio.cgi?pass=kolecko&output1=4&output4=4
Let us use the NETIO “demo” device as the remote device and toggle its output 1:
http://netio-4c.netio-products.com:8080/netio.cgi?pass=&output1=4
Then, configure both actions in the FLIC app as described above.
The second action is added by tapping “Click” again. Several actions can be added (we have tested up to 12).

What else can the FLIC button do?
Each FLIC button can generate three events:
- CLICK – pressed for a short time
- DOUBLE CLICK – two presses in rapid succession
- HOLD – held pressed for about 2 seconds
For example, the “hold” function can be used to switch off several outputs on several NETIO devices. The steps to do that are very similar to the previous example.
First, construct the URLs for controlling individual devices. Make sure to specify the correct password for each device.
Switching off all outputs of the first device:
http://[IP of my first device]/netio.cgi?pass=kolecko&output1=0&output2=0&output3=0&output4=0
Switching off all outputs of the second device:
http://[IP of my second device]/netio.cgi?pass=kolecko&output1=0&output2=0&output3=0&output4=0
Switching off all outputs of the third device:
http://[IP of my third device]/netio.cgi?pass=kolecko&output1=0&output2=0&output3=0&output4=0
Before using the URLs in the FLIC device, test them in a browser and make sure that the action is indeed performed.
Just as before, insert three Internet Request actions one by one under the HOLD action of the button.

By holding the button pressed, you can now switches off all outputs of devices with IP addresses 192.168.193.98, 192.168.193.91 and 192.168.193.98 respectively.
FAQ
1) Is it possible to set up the connection without the iOS / Android app?
No, Flic buttons can only be configured using the mobile app.
2) Do I need an Internet connection to use the buttons?
No, the hub controls the sockets locally, over a LAN. The system does not require a connection to the Internet.
3) How many power sockets can be controlled with one button and one of its 3 actions?
We have tested up to 12 outputs (of several devices). This may depend on the ecosystem (firmware version) of the hub.