
The PIXILAB Blocks® is a software for producing and managing rich experiences for visitor centers, museums, exhibitions and corporate presentations. It features a unique mix of content and display management, control system capabilities, interactive presentation and mobile guide functions.
- PIXILAB Blocks® is the one-stop-shop software for creating dynamic room experiences. Display, control, interact — all in one system.
- IT meets AV: PIXILAB Blocks® runs on a local server, using standard network and web technologies, plus industry-standard lighting and IoT protocols.
- Blocks and spots: Arrange content using our smart building blocks. Then drag those to the display spots. Quick and simple as that.

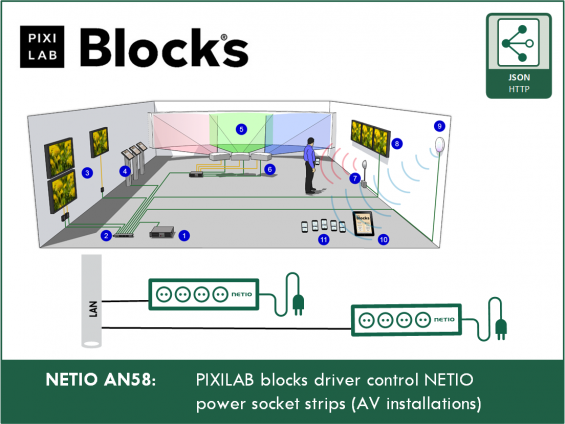
Hugo Janzen AV Projecten B.V. company in cooperation with Jeffrey Davidsz created a driver for PowerBOX 3Px device to be controlled via PIXILAB Blocks® system.
PIXILAB Blocks® video Overview:
Download the NETIO - PIXILAB Blocks
Download NETIO PIXILAB Blocks - driver: https://github.com/pixilab/blocks-script/tree/master/driver
Configuration of NETIO devices to work with PIXILAB – JSON API
The driver is using default enabled JSON over HTTP protocol to communicate with NETIO devices.
It is recommended to either set a static IP address in the device or assign it a reservation in the site’s DHCP server so that the IP doesn’t change.
NETIO device Static IP settings
- Login to the device web configuration
- Go to Settings >> Network Configuration
- Select “Set static IP address” and enter details (IP address, Net mask, Default gateway, DNS server.
- Click Save changes and allow the unit a few minutes to save and reboot.
- Check the device web administration using the new IP address.

Enable JSON protocol Support in the NETIO device:
- Login to the device web configuration
- Go to M2M API Protocols >> JSON API
- Enable JSON API
- Enable READ-WRITE checkbox
- Set the empty username for Enable READ-WRITE.
- Set the empty password for Enable READ-WRITE.
- Click Save changes and allow the unit a few minutes to save and reboot.
JSON is default configuration
JSON protocol with “netio” & “netio” as username & password for R/W credentials is default configuration for NETIO devices. To use it with NETIO PIXILAB Blocks remove name & password

PIXILAB Network Device Drivers
Some devices have more complex protocols, or require specialized handshaking or other care for establishing reliable communication. Such devices can be hard to control reliably by just sending command strings. Furthermore, the syntax used by some protocols isn’t easy to understand and get right.
To overcome such issues, specialized “drivers” can be provided. A driver is a piece of software that has detailed knowledge about the communication protocol, and knows how to communicate with the device in a reliable way.
An added benefit of a device driver is that it can expose higher level functionality, rather than the details of the underlying communication protocol. For instance, you may want a “power” property for turning a projector on or off, or perhaps an “input” property for switching video inputs. The driver typically exposes such properties, then linked to buttons and tasks for direct control.
Once a device driver has been installed on the server, it can be selected on the “Driver” menu in the settings pane. New drivers are developed by PIXILAB and partners as needs arise. Contact PIXILAB for the latest information on available drivers, or check out PIXILAB’s github page where we keep most drivers.
PIXILAB Blocks configuration
NETIO devices can be controlled over the local network using standard IP protocols using TCP. Therefore NETIO devices can be controlled by Blocks by adding it under TCP/UDP Devices on the Manage page, specifying its IP address and port number. The IP address needs to be set on the device as described above.

To add a device, choose “Network Device” on the Add menu. Then specify its Name, IP Address and Port Number and Driver set “NetioPowerBox”. The Name will subsequently be used to program the device, so use a short but descriptive name. Choose the TCP Communication Mode.
When using the TCP communications mode, Blocks will automatically attempt to connect to the device. Successful connection changes the color of the status indicator in the list to green.
The control of outputs is made through the Tasks.

FAQ
1) Is the NETIO driver for PIXILAB Blocks free of charge?
Yes. The driver is free of charge available on GitHub.
2) Can I use NETIO Cloud in parallel to PIXILAB connection?
Yes, NETIO Cloud works in parallel to JSON API protocol (used in the driver).
3) Can I use NETIO Mobile app in parallel to PIXILAB connection?
Yes, NETIO Mobile app works in parallel to JSON API protocol.
4) Will the driver work also with 4 or 8 outputs NETIO devices?
Yes, driver is tested with NETIO device with 1 / 4 outputs. Should work even with other output combinations.
5) Some NETIO devices has also DI (Digital Inputs) with S0 pulse counters. Can I use this also in the driver?
No, current version of the driver supports power outputs only.
Ask for DI enabled version when you will need that.
Supported FW versions for NETIO devices
- PowerBOX 3Px: firmware 2.4.4 and later