
Use cases and setup benefits
As Albert Einstein said, “Everything should be made as simple as possible, but not simpler.” That is why NETIO products started cooperation with ProDVX. Both companies are creating affordable and high-quality equipment for business installations and are good complements in lightweight solutions for local and remote control of electrical appliances.
Everybody can make control systems for electrical appliances without programming. Just the basic networking knowledge and the ability to plug the sockets is enough to configure and build professional systems for installations like the following ones:
Powering the individual exposition in a museum exhibition
- Every exposition can be switched ON/OFF from the central control panel placed for example at the ticket office
- NETIO device internal schedule can be used to schedule every exposition separately according to opening hours or planned guided tours
- Guide or security can bypass or deactivate the scheduler function from the control panel
Industrial hall lights control from everywhere
- Lights can be scheduled to be on during working hours
- Local panel and remote NETIO Cloud control gives the ability to manually bypass the schedule anytime
- The control panel can be placed everywhere where is a local network (WiFi or LAN)
Outdoor lighting on private property
- Outdoor lighting can be scheduled for the evening only with a start according to sunset (the schedule is automatically calculated based on local time and geolocation)
- Local panels give the ability to control the light for everybody like a simple switch during the night when needed
- NETIO cloud gives the ability to control the lights from everywhere by users' mobile phone
In general, this setup can be used everywhere where is needed simple control panel for NETIO Smar power sockets.
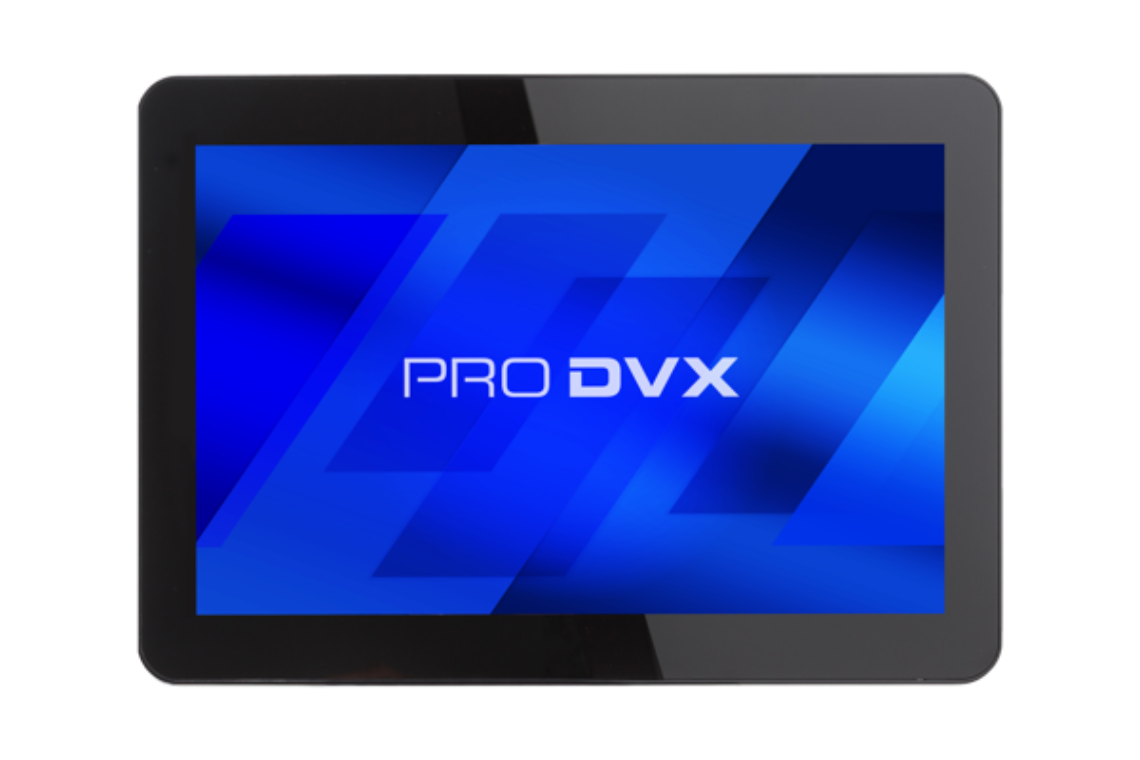
ProDVX APPC-10XP
The ProDVX APPC-10XP is an Android Panel PC with a 10.1” Touch Display and Power over Ethernet (PoE). The ProDVX APPC-10XP comes with Android 9. This device can be connected through RJ45 LAN or WiFi and contains a standard option to schedule reboot or shut down. It can be mounted using the VESA 75 brackets. This Android SOC Touch Display has a projected capacitive touch display and plastic housing. Main advantage of this device is tested compatibility with NETIO Mobile 2 application.
Supported Devices
NETIO devices:
- PowerBOX 3Px
- PowerBOX 4Kx
- PowerCable 101x
- PowerCable 2PZ
- PowerCable 2KZ
- PowerPDU 4PS
- PowerPDU 4KS
- PowerPDU 8QS
- PowerPDU 4C
- PowerDIN 4PZ
ProDVX devices:
- APPC-10XP 10“ Android Panel PC (full NETIO Mobile 2 app features support)
Example Scenario
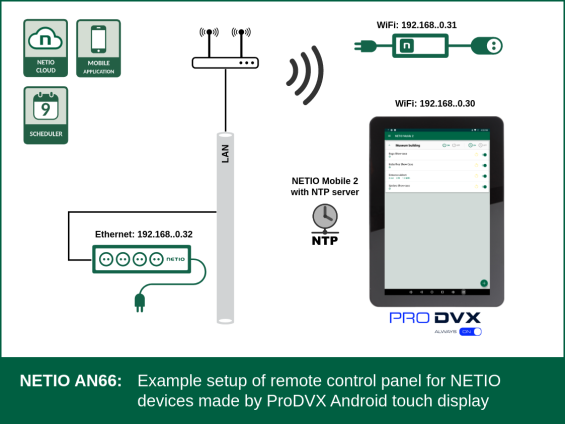
In this example, we will create a standalone offline system with a locked user control panel and two remote-controlled power sockets. This tutorial pretends at least basic IP networking skills. In general parameters of the system will be the following:
- 1x PowerBOX 3PF – three 230V sockets controlled over LAN
- 1x PowerCable REST 101F - one 230V socket controlled over WiFi
- 1x ProDVX APPC-10XP 10“ panel PC – user control panel with NETIO Mobile 2
- Static IP Network plan
- Scheduling ON during opening hours from 9:00 am to 6:00 pm
- Offline setup without internet connection using local NTP server

Preparing the Network Plan
In real cases, you need to consider the present Network setup and get an address plan from a system administrator. All devices must have always the same IP address. You can use static IP configuration in devices or you can ask the administrator to create an IP address reservation based on a physical MAC address. IP address reservation based on MAC is the best solution for static installations. In our example we will use the following configuration:
WiFi SSID: NETIO-ProDVX-WiFi
WiFi password: noprogramming
ProDVX panel PC static IP: 192.168.0.30 / 24
PowerCable 101F static IP: 192.168.0.31 / 24
PowerBOX 3PF static IP: 192.168.0.32 / 24
NETIO products admin password: secretpasswd
NETIO Mobile 2 Simple Mode password: password
Configuration of ProDVX control panel
Connecting ProDVX touch screen to a network
First, we need to connect the touch screen to the networks. It is simple, like in any other Android devices. Start the device and open the WiFi settings. Select the prepared network „NETIO-ProDVX-WiFi“ and click to connect to the network. Do not forget to set up a static IP to have the same IP after every restart. It is recommended to make an IP address reservation based on the MAC address. For hints, see the picture below.

Install NETIO Mobile 2 Application
Once the tablet is connected, we need to install NETIO Mobile 2. It is good to be connected to the public internet for the next step because we need to download NETIO Mobile 2 APK from https://www.netio-products.com/en/download. You can also download it with a different device and upload it to the ProDVX touchscreen over Bluetooth or USB. See the pictures below for installation hints over the internet.

Enable NTP server in NETIO Mobile 2 Application
Once the installation is not online, we need a local NTP server. It can be made by NETIO Mobile 2 and ProDVX APPC-10XP 10“ Android Panel PC. The NTP server can be simply enabled in application settings. To keep it in operation the app needs to run in background mode so please allow this feature when asked by the system. For details see the picture below.
NTP server functionality can depend on touchscreen settings and software configuration. We recommend using tested hardware APPC-10XP 10“. With other touchscreens, this feature is not guaranteed.

Configuration of NETIO devices
Configuration of PowerCable 101F
For PowerCable 101F installation, we will use again, the touchscreen. By default, the NETIO PowerCable is in AP installation mode. It creates an AP with SSID related to its physical address (MAC). E.g. „PowerCable-AP-7E“. To connect PowerCable to your network follow PowerCables Quick Installation Guide or the next steps:
- Connect with your ProDVX touch screen to WiFi with the name „PowerCable-AP-7E“
- Open the Lightning web browser and fill in the address (http://cobra.netio or http://10.0.42.1) to get into PowerCable AP installation mode
- Select „NETIO-ProDVX-WiFi” Network and click Next
- Fill in the name of the device “Entrance Advertisement”
- Set up static IP address according to plan to 192.168.0.31/24
- Save New settings
- ProDVX touchscreen should be automatically reconnected back to the NETIO-ProDVX-WiFi network once the PowerCable is installed.

To finish the complete installation of this device is necessary to prepare the configuration of the output name, and the schedule, and change the admin password from default to some unique password.
- In output details, set the output name to “Entrance Advert
- Set NTP server address to ProDVX touchscreen with IP 192.168.0.30 in menu Settings→Date/time→Use NTP Server
- In Users→admin, change the administrator password to “secretpasswd”

Configuration of PowerBOX 3PF
PowerBOX 3PF is Ethernet connected device. To install the device, we recommend assigning an IP address based on MAC (serial number) which is printed on the device. In case, you are not able to create MAC based IP reservation, follow the instructions in PowerBOX 3PF Quick Installation Guide to install the device to network with static IP. Follow the next instructions to finish the setup of PowerBOX 3PF including output names, NTP server, schedule, and admin password.
- Set the static IP address to 192.168.0.32/24 and save the configuration
- Fill in the NTP server address (Settings→Date/Time) with ProDVX touch screen IP address “192.168.0.30.”
- Name the device in Settings→System→Device Name to “Insect Expo.”
- Create a schedule to have to output switched on during working days between 9 am and 6 pm. (Schedules→Create schedule).
- Set and enable new schedules to the outputs where they should be applied. (Output details→Schedule).
- Name the outputs according to their usage. In this example, we have used the names “Bugs Show-case,” “Spiders Show-case,” “Butterflies Show-case.”
- Set the administrator password to “secretpasswd” (Users->admin).
See the pictures below for hints and details.


Configuration of NETIO Mobile 2 app
Once all the hardware is installed we can go to add devices into NETIO Mobile 2, make one master group and enable kiosk mode to prevent any misconfiguration by random users.
Adding NETIO devices to mobile app
Add devices to the NETIO Mobile app with click on the “+” button. Then you can select which method you want to use. The selected method depends on how large is your setup. Find devices automatically usually works in smaller networks otherwise large networks where routing is applied. The manual way is good enough if you know details about your device. In our example, we will try to find the device automatically and add every device one by one. During the device setup don’t forget to use the changed admin password in the device “secretpasswd” otherwise the connection will not work. We don’t have to take care of IP addresses because they are already set to static or MAC-based reservation so we can be sure that it will be always the same. For details on how to add devices check the pictures below.


Organizing devices into groups
Organising devices into groups can be done by changing output details and moving the outputs by Drag&Drop. A new group “Museum Building” will be created by clicking on one of the outputs and opening Settings. In the menu can be changed the output name (only locally in the mobile app) and group name. Put “Museum Building” into the group name and confirm. Now a new group is created and the output is assigned to this group. To move all the other outputs to this one group use Drag & Drop for every output.

Enabling KIOSK mode
When all the device configurations and names are ready, KIOSK mode can be enabled. For this, there is more setting in NETIO Mobile 2 App.
- Long touch for control – for Kiosk mode this option can be disabled. Enabling the feature cause that when you want to switch the state of the output, you need to hold the button for 2 seconds. This is a prevention to randomly pushing buttons when using mobile devices.
- Application auto-start after boot – this feature is necessary for KIOSK mode otherwise the user will see the Android main desktop.
- Immersive mode (full screen) – this mode set the system to hide all navigation bars and status panels and runs NETIO Mobile App in full screen. Very good to use in KIOSK mode.
- Simple control mode - this is administrator settings lock. Once an administrator does not want that anybody else will change the setup, this Simple control mode can be used. All the configuration functions are disabled, no device can be added, Drag&Drop for groups can not be used and Settings can be opened only with a password. Which was set by the administrator when enabling the Simple control mode.
In our example, all features in the settings will be enabled step-by-step. Simple control mode will be the last one which will be enabled because immediately after enabling Simple control mode the application settings will be locked by a password: “password”. Usually, this is the last step of the installation.

Now the small example setup of simple control panel is finished. Enjoy!
