
Supported devices: NETIO 4All, PowerPDU 4C, NETIO 4, PowerCable MQTT 101x
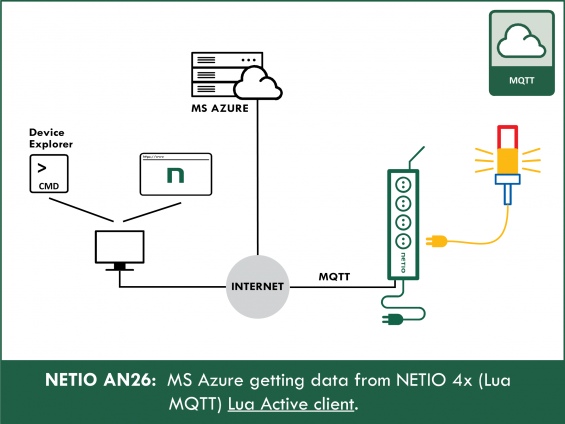
NETIO 4x smart socket devices can be connected using the MQTT M2M protocol to the MS Azure IoT Hub. This Application Note demonstrates how to do it using the Device Explorer (Device Explorer Twin) tool. This tool also allows to monitor the communication between the IoT Hub and the NETIO device.
MS Azure IoT Hub and NETIO 4x smart sockets
The first step in connecting your NETIO device to MS Azure is the creation of an IoT Hub. This is done in MS Azure (https://azure.microsoft.com/).

The NETIO device can be connected to the IoT Hub either directly in Azure, or using the Device Explorer tool. First, download SetupDeviceExplorer.msi from the https://github.com/Azure/azure-iot-sdk-csharp/releases page.

Then, install the tool and start it.
When started, the tool displays the following window:

In the IoT Hub Connection String field, enter the Connection String for your IoT Hub and click Update to confirm the connection. The Connection String needs to be obtained from MS Azure after registering the NETIO device to the IoT Hub (for detailed instructions, see https://docs.microsoft.com/en-us/azure/iot-hub/iot-hub-csharp-csharp-device-management-get-started).

If the connection is successful, the following window appears:

Now add the NETIO device. In the Management section, click Create to add a new device.

In the window that appears, select a Device ID (it can be anything) and leave all other pre-filled parameters intact. Click Create to create the device.

Now it is necessary to get the Connection string for the newly created device.
Simply right-click the device and select Copy connection string for selected device(s).

This Connection string needs to be entered into the NETIO device. In its web interface, configure the M2M API Protocols - MQTT section as follows:
Enable MQTT – checked
MQTT Mode – MS Azure
Device connection string – paste the copied Connection string here
Validate server’s SSL certificate – checked
Update period – set as needed (the default is 30 seconds)
Click Save Changes to save the settings.

After saving the changes, the MQTT status should change to: Connected (Connected) and a green dot should appear next to the MQTT tab.
The Device Explorer can be used to check the communication. In the Data section, after configuring the Event Hub and the device, click Monitor. Received messages start to appear.

FAQ:
1) I don’t have the Windows operating system, what should I do?
If you use an operating system other than Windows, you can manage the Azure IoT Hub using Visual Studio Code with the Azure IoT Hub Toolkit extension: https://github.com/Microsoft/vscode-azure-iot-toolkit/wiki
2) Does the connection require MQTT flex?
No, the AN26 example uses the standard M2M API – MQTT mode: MS Azure, which is supported by all NETIO 4x devices.
Supported FW versions:
3.1.0 and higher (Firmware Archive)