
Supported devices: NETIO 4All, PowerPDU 4C, NETIO 4, PowerCable REST, PowerBOX 3Px, PowerPDU 4PS, PowerDIN 4Pz, PowerBOX 4Kx, PowerPDU 8QS
About Domoticz
Domoticz (https://www.domoticz.com) is a Home Automation System that can monitor and configure various devices, such as lights, switches, various sensors and meters (like temperature, precipitation, wind, ultraviolet (UV) radiation, electricity consumption/production, gas and water consumption), and much more.
Notifications and alerts can be sent to any mobile device.
Domoticz is free of charge and open source. It can be used on Raspberry Pi, Windows, Linux, Mac OS X and embedded devices. It is designed to operate in various operating systems. The user-interface is a scalable HTML5 web frontend, and is automatically adapted for Desktop and Mobile Devices. Compatible with all browsers. Domoticz was first released in December 2012.
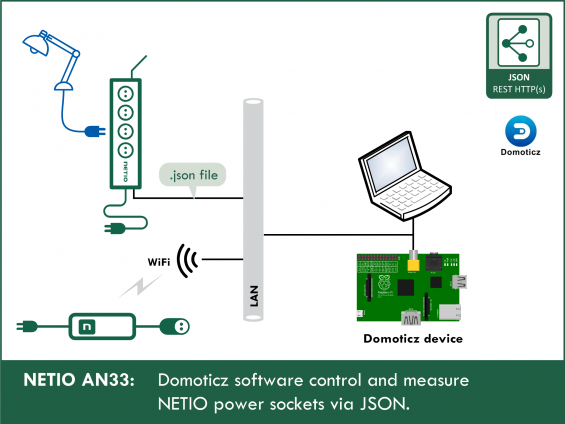
About AN33
The AN33 Application Note describes the configuration of Domoticz using shell scripts. The http get protocol is used to transfer netio.json files from the NETIO smart socket devices. Utilities in the Linux operating system are also used, namely cron for starting the scripts periodically, and jq and bc for parsing and conversions.

- In the Domoticz system, a dashboard can be created to show the values measured by the NETIO smart sockets.
- With sw switches, individual power outlets can be switched on and off to control any 110/230V appliances.
As a built-in feature, Domoticz can operate the switches e.g. at sunset or sunrise, or couple the switches in various ways. It is also possible to perform an action, such as run a script. We use this possibility to send a command to the NETIO device using http post.
To update the values in the dashboard, let us create a script for downloading the current state of the NETIO smart sockets device as a netio.json file using http get. We will configure the system to run this script every minute, as well as whenever any of the sw 1-4 switches is flipped.
Install Domoticz with the following command:
curl -L install.domoticz.com | sudo bash
The installer installs Domoticz and configures it as a service that is started at system startup.
The jq and bc utilities will be also needed. To install them:
sudo apt-get install jq bc
Now it is time to create the dashboard.
On the machine where Domoticz is running, browse to http://127.0.0.1:8080 If you are using another machine, enter the IP address of the machine with Domoticz.

Select HARDWARE in the menu. Then, when selecting the device, select Dummy

Enter dm1 as its name and click ADD.
Select Create virtual sensor – each switch must have its dummy counterpart, i.e. we will also need to create dm2 dm3 dm4

Use Current1 as the name and select Ampere (1 Phase) as the Sensor Type

In this way, create the entire dashboard. Use Voltage for voltage, Usage for power, Counter for the energy consumption (kWh). For TruePF and frequency, use Custom Sensor. Text is used for energy start.
The created sensors are now on the UTILITY tab.

Click the star to display the element in the dashboard.
Create the switches on the SWITCHES tab. Select MANUAL LIGHT/SWITCH.

Create all four switches in this way. They will be on the SWITCHES tab.

Here, they can be further edited, e.g. the icon changed

Configuring NETIO 4x
In the M2M API Protocols - JSON API section of the web interface, enable URL JSON API.
Set the Username and Password for READ-WRITE access.
READ-WRITE credentials allow both reading and writing. The same READ-WRITE credentials can be used in both HTTP Request blocks (POST and GET).
Click Save Changes. After saving the changes, the device restarts (about 1 minute).

NETIO JSON http(s) protokol
The current outlet state when reading (0 / 1) is in the State variable. This variable is read/write, as long as the Action variable is omitted or set to 6.
If the Action variable in the uploaded netio.json file is set to a value different than 6, it takes precedence, and the value in the State variable is ignored.
Actions applicable to each output (electrical socket)
In all M2M protocols, NETIO power socket devices use the same actions that can be applied to individual outputs. For example, a Toggle or Short Off action can be written to any output.
However, the Action variable can only be used for writing values, it cannot be used to read the current socket state.
- 0 = Output switched off (Off)
- 1 = Output switched on (On)
- 2 = Output switched off for a short time (shortOff)
- 3 = Output switched on for a short time (short On)
- 4 = Output switched from one state to the other (toggle)
- 5 = Output state unchanged (no change)
- 6 = Ignored
The value of 6 in the Action tag means that the action is ignored and the outlet state is set according to the “State” variable (allowed values are 0 and 1 only). See the M2M JSON documentation.
Example – JSON file to toggle (action 4) the output no. 1:
{
"Outputs": [{
"ID": 1,
"Action": 4
}]
}
Implementation in Domoticz
In AN33, the NETIO sockets are controlled from Domoticz using two scripts for each socket – i.e. setnetio11.sh and setnetio10.sh for switching socket 1 on and off respectively.
Open a terminal on the machine with Domoticz. In the home folder, you will find:
/domoticz/scripts/
Create the first script:
nano setnetio11.sh
#!/bin/bash
curl -X POST -H "Content-Type: application/json" -d '{"Outputs":[{"ID":1,"Action":1}]}' http://netio-ip:8080/netio.json
sleep 1
/home/uživatel/domoticz/scripts/gentab.sh
exit 0
Save it and create the second script :
nano setnetio10.sh
#!/bin/bash
curl -X POST -H "Content-Type: application/json" -d '{"Outputs":[{"ID":1,"Action":0}]}' http://netio-ip:8080/netio.json
sleep 1
/home/uživatel/domoticz/scripts/gentab.sh
exit 0
Repeat this for all sockets, changing the ID value appropriately :
nano setnetio20.sh
#!/bin/bash
curl -X POST -H "Content-Type: application/json" -d '{"Outputs":[{"ID":2,"Action":0}]}' http://netio-ip:8080/netio.json
sleep 1
/home/uživatel/domoticz/scripts/gentab.sh
exit 0
Remember to change the netio-ip and username, and to allow all eight scripts to be executed:
chmod +x setnetio10.sh
.
.
chmod +x setnetio41.sh
Now create the following script:
nano gentab.sh
#!/bin/bash # Download the current output states and measured values from the NETIO sockets, save to netio.json # IP address of the online demo, change to the IP of your NETIO device wget -q -O netio.json http://netio-4all.netio-products.com:8080/netio.json # # Get the Voltage value from netio.json # val=$(jq '.GlobalMeasure.Voltage' netio.json) # # Display it in the panel with IDX 26 # curl "http://127.0.0.1:8080/json.htm?type=command¶m=udevice&idx=26&nvalue=0&svalue=$val" val=$(jq '.GlobalMeasure.OverallPowerFactor' netio.json) curl "http://127.0.0.1:8080/json.htm?type=command¶m=udevice&idx=32&nvalue=0&svalue=$val" val=$(jq '.GlobalMeasure.Frequency' netio.json) curl "http://127.0.0.1:8080/json.htm?type=command¶m=udevice&idx=30&nvalue=0&svalue=$val" # # # Get the TotalCurrent value. Domoticz gives current in A, Netio in mA, conversion is needed # vall=$(jq '.GlobalMeasure.TotalCurrent' netio.json) # # total current in mA is divided by 1000 and given with 3 decimal places # val=$(bc <<< "scale=3;$vall/1000") curl "http://127.0.0.1:8080/json.htm?type=command¶m=udevice&idx=27&nvalue=0&svalue=$val" val=$(jq '.GlobalMeasure.TotalLoad' netio.json) curl "http://127.0.0.1:8080/json.htm?type=command¶m=udevice&idx=28&nvalue=0&svalue=$val" val=$(jq '.GlobalMeasure.TotalEnergy' netio.json) curl "http://127.0.0.1:8080/json.htm?type=command¶m=udevice&idx=29&nvalue=0&svalue=$val" val=$(jq '.GlobalMeasure.EnergyStart' netio.json) curl "http://127.0.0.1:8080/json.htm?type=command¶m=udevice&idx=31&nvalue=0&svalue=$val" vall=$(jq '.Outputs[] | select(.ID==1) | .Current ' netio.json) val=$(bc <<< "scale=3;$vall/1000") curl "http://127.0.0.1:8080/json.htm?type=command¶m=udevice&idx=6&nvalue=0&svalue=$val" val=$(jq '.Outputs[] | select(.ID==1) | .Load ' netio.json) curl "http://127.0.0.1:8080/json.htm?type=command¶m=udevice&idx=15&nvalue=0&svalue=$val" val=$(jq '.Outputs[] | select(.ID==1) | .Energy ' netio.json) curl "http://127.0.0.1:8080/json.htm?type=command¶m=udevice&idx=14&nvalue=0&svalue=$val" val=$(jq '.Outputs[] | select(.ID==1) | .PowerFactor ' netio.json) curl "http://127.0.0.1:8080/json.htm?type=command¶m=udevice&idx=22&nvalue=0&svalue=$val" vall=$(jq '.Outputs[] | select(.ID==2) | .Current ' netio.json) val=$(bc <<< "scale=3;$vall/1000") curl "http://127.0.0.1:8080/json.htm?type=command¶m=udevice&idx=9&nvalue=0&svalue=$val" val=$(jq '.Outputs[] | select(.ID==2) | .Load ' netio.json) curl "http://127.0.0.1:8080/json.htm?type=command¶m=udevice&idx=16&nvalue=0&svalue=$val" val=$(jq '.Outputs[] | select(.ID==2) | .Energy ' netio.json) curl "http://127.0.0.1:8080/json.htm?type=command¶m=udevice&idx=17&nvalue=0&svalue=$val" val=$(jq '.Outputs[] | select(.ID==2) | .PowerFactor ' netio.json) curl "http://127.0.0.1:8080/json.htm?type=command¶m=udevice&idx=23&nvalue=0&svalue=$val" vall=$(jq '.Outputs[] | select(.ID==3) | .Current ' netio.json) val=$(bc <<< "scale=3;$vall/1000") curl "http://127.0.0.1:8080/json.htm?type=command¶m=udevice&idx=10&nvalue=0&svalue=$val" val=$(jq '.Outputs[] | select(.ID==3) | .Load ' netio.json) curl "http://127.0.0.1:8080/json.htm?type=command¶m=udevice&idx=19&nvalue=0&svalue=$val" val=$(jq '.Outputs[] | select(.ID==3) | .Energy ' netio.json) curl "http://127.0.0.1:8080/json.htm?type=command¶m=udevice&idx=18&nvalue=0&svalue=$val" val=$(jq '.Outputs[] | select(.ID==3) | .PowerFactor ' netio.json) curl "http://127.0.0.1:8080/json.htm?type=command¶m=udevice&idx=24&nvalue=0&svalue=$val" vall=$(jq '.Outputs[] | select(.ID==4) | .Current ' netio.json) val=$(bc <<< "scale=3;$vall/1000") curl "http://127.0.0.1:8080/json.htm?type=command¶m=udevice&idx=13&nvalue=0&svalue=$val" val=$(jq '.Outputs[] | select(.ID==4) | .Load ' netio.json) curl "http://127.0.0.1:8080/json.htm?type=command¶m=udevice&idx=20&nvalue=0&svalue=$val" val=$(jq '.Outputs[] | select(.ID==4) | .Energy ' netio.json) curl "http://127.0.0.1:8080/json.htm?type=command¶m=udevice&idx=21&nvalue=0&svalue=$val" val=$(jq '.Outputs[] | select(.ID==4) | .PowerFactor ' netio.json) curl "http://127.0.0.1:8080/json.htm?type=command¶m=udevice&idx=25&nvalue=0&svalue=$val" # # Update the socket states, they could have been changed e.g. from the Netio web interface # val=$(jq '.Outputs[] | select(.ID==1) | .State ' netio.json) curl "http://127.0.0.1:8080/json.htm?type=command¶m=udevice&idx=2&nvalue=$val" val=$(jq '.Outputs[] | select(.ID==2) | .State ' netio.json) curl "http://127.0.0.1:8080/json.htm?type=command¶m=udevice&idx=3&nvalue=$val" val=$(jq '.Outputs[] | select(.ID==3) | .State ' netio.json) curl "http://127.0.0.1:8080/json.htm?type=command¶m=udevice&idx=4&nvalue=$val" val=$(jq '.Outputs[] | select(.ID==4) | .State ' netio.json) curl "http://127.0.0.1:8080/json.htm?type=command¶m=udevice&idx=5&nvalue=$val" exit 0
Remember to change most of the IDx according to your numbering, and to set the execute permissions:
chmod +x gentab.sh
IDX can be found in SETUP>DEVICES

Reading the socket states periodically
Now, let gentab.sh run every minute:
In the terminal, as the user, run
crontab –e
An editor opens. At the beginning of the file, there are instructions (commented out). In the first empty line, enter the following:
* * * * * /home/uživatel/domoticz/scripts/gentab.sh
Save.
Now the script should run every minute.
Configuring the sw switches
The OnAction and OffAction values need to be entered for each switch:

If you wish to use shortOff / shortOn / Toggle functions, add the corresponding dm4 – dm8 dummies and create the scripts:
nano shortoff1.sh
#!/bin/bash
curl -X POST -H "Content-Type: application/json" -d '{"Outputs":[{"ID":1,"Action":2}]}' http://netio-ip:8080/netio.json
exit 0
Save and set the execute permissions:
chmod +x shortoff1.sh
For the Toggle function, the panel values need to be updated again. The toggle4.sh script would look like this:
#!/bin/bash
curl -X POST -H "Content-Type: application/json" -d '{"Outputs":[{"ID":4,"Action":4}]}' http://netio-ip:8080/netio.json
sleep 1
/home/uživatel/domoticz/scripts/gentab.sh
exit 0
In the SWITCHES menu, create another switch of the Push On Button type:

Then, edit the ShortOff1 switch and in the OnAction field, enter script://shortoff1.sh
The result in the Dashboard looks like this:

In this way, it is possible e.g. to power-cycle a frozen computer connected to outlet no. 1 with a single touch of a button
Summary
The procedure described here can be used in Domoticz for all NETIO smart socket devices that support HTTP JSON.
Supported devices:
- NETIO 4
- NETIO 4All
- PowerPDU 4C
- PowerPDU 4PS
- PowerBOX 3Px
- PowerDIN 4Pz
- PowerCable REST 101x