
Supported devices: PowerCable MQTT, PowerBOX 3Px, PowerPDU 4PS, PowerDIN 4Pz, PowerBOX 4Kx, PowerPDU 8QS
MQTT (Message Queuing Telemetry Transport) is a simple protocol for exchanging messages among devices. MQTT is often used in IoT applications and related cloud services. The standard MQTT protocol is used with various topic and payload structures. Therefore, the data input from a particular device typically requires server-side configuration.
MQTT-flex is an extended implementation of MQTT. The device contains a configuration file where the MQTT topic and MQTT payload structures can be defined.
How does it work
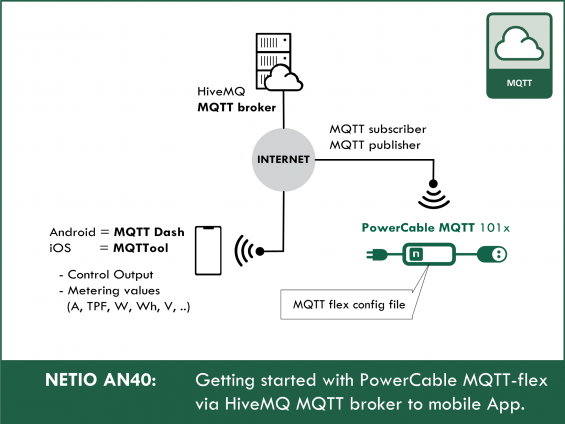
In the AN40 example, PowerCable MQTT measures energy consumption and maintains a connection to a MQTT broker. Messages are sent according to the settings in the MQTT-flex configuration script. The messages are sent to the public HiveMQ MQTT broker; therefore, PowerCable MQTT needs to be connected to a Wi-Fi network to access the Internet. The MQTT messages are subsequently downloaded from the MQTT server by a mobile app (MQTT Dash or MQTTool).
The mobile application can then be used to control the power output with a simple click of a button.
The NETIO AN40 example consists of the following parts:
- Basic description of MQTT-flex
- Configuring MQTT-flex at the NETIO device (PowerCable MQTT 101x)
- Connecting the NETIO device over MQTT-flex to the public HiveMQ MQTT broker
- Controlling the PowerCable socket with a mobile app over the MQTT-flex protocol
Video tutorial on Youtube:
NETIO MQTT-flex
MQTT-flex is implemented as an M2M API protocol, where the NETIO device is the message Publisher that provides the output states and measured values. At the same time, the NETIO device is a message Subscriber so that its power output can be controlled by receiving messages. Both ways of communication (Publisher/Subscriber) can run in parallel against a public or private MQTT Broker. As an example of a public MQTT broker, broker.hivemq.com is used in this example. A private MQTT broker can be a device in the local network (e.g. a Raspberry Pi) or a LTE/WiFi gateway with support for the MQTT Broker function.


Supported actions for controlling the output using MQTT-flex
The actions for an output are numbered the same way in all M2M protocols supported by NETIO:
0 = Output switched off (Off)
1 = Output switched on (On)
2 = Output switched off for a short time (Short OFF) – device restart
3 = Output switched on for a short time (Short ON)
4 = Output switched from one state to the other (Toggle)
5 = Output state unchanged (no change)
For actions 2 and 3, a Delay parameter (in milliseconds) can be specified in the message. If the parameter is omitted, the default value (defined in the web administration) is used.
-
The NETIO power socket device behaves as a MQTT subscriber. Based on the commands received, the device carries out the requested action (switches its output).
- The NETIO device also works as a MQTT publisher, sending messages with its measurements and output states (periodically according to the specified timing, or whenever a parameter changes by a certain “delta” value).
NETIO MQTT-flex configuration script
NETIO MQTT-flex configuration is specified in the JSON format and consists of three parts:
- Broker
- Subscribe
- Publish
{
    "config":{
        "broker":{
            <broker definitions>
        },
        "subscribe":[
            {
                <subscribe topic 1 definitions>
            }
        ],
        "publish":[
            {
                <publish  topic 1 definitions>
            },
            {
                <publish  topic 2 definitions>
            }
        ]
    }
}
Broker section (MQTT-flex config script)
This section configures the details of the broker to connect to.
Here it is possible to change the MQTT broker, login credentials, and so on

Example
"broker":{
            "url":"broker.hivemq.com",
            "protocol":"mqtt",
            "port":1883,
            "ssl":false,
            "type":"generic",
            "username":"freedom",
            "password":"peace|LOVE|empathy4ALL"
        }
For more information about configuring the broker in MQTT-flex, see:
https://wiki.netio-products.com/index.php?title=MQTT-flex#Broker
Subscribe section (MQTT-flex config script)
The Subscribe section defines the topic that the MQTT-flex device listens for and acts accordingly.
The values in the messages in the subscribed topic indicate the action to take with the output:
netio/{DEVICE_NAME}/output/1/action with a message to control the output: (0 – off, 1 – on, 2 – short off, 3 – short on, 4 – toggle, 5 – no change)
IF the device receives a message in the topic THEN it performs the action with the target
- topic – string containing the path
- target – name of the output/value to control/write
-
action – action to perform with the target (output switched or value written)
- Supported NETIO actions: 0 – off, 1 – on, 2 – short off, 3 – short on, 4 – toggle, 5 – no change
Example
"subscribe":[
            {
                "topic":"netio/${DEVICE_NAME}/output/1/action",
                "qos":0,
                "target":"OUTPUTS/1/ACTION",
                "action":"${payload}"
            }
        ],
For more information about configuring the Subscribe section in MQTT-flex, see:
https://wiki.netio-products.com/index.php?title=MQTT-flex#Subscribe
Publish section (MQTT-flex config script)
If you need data to be sent from the device to the MQTT broker, include the Publish section.
“Events” are used to specify when should the device send data to the MQTT broker. Messages can be sent periodically (e.g. “timer” with a value 1111 seconds) or when the value of a variable changes with respect to the last transmitted value (e.g. load [mW] at output 1). In this example, a message is sent to the MQTT broker whenever the power at output 1 changes by at least one mW and also once every 1111 seconds. In reality, this will lead to a flood of messages; we recommend to set the “delta” value to 10000, that is to send a message if the load changes by at least 10W (corresponds to 43mA at 230V).
The Publish section consists of one or more segments. A segment always contains:
- "topic":"netio/${DEVICE_NAME}/output/1/state"
Topic where the data are published.
- "payload":"${OUTPUTS/1/STATE}",
What data is published.
- "events":[
{
"type":"change",
"source":"OUTPUTS/1/STATE"
}
Events that trigger the publishing of data (in this case, whenever the output state changes).
Possible actions are: change, delta, timer
IF event, THEN send a message with the payload to the topic
Example
 "publish":[
            {
                "topic":"netio/${DEVICE_NAME}/output/1/state",
                "qos":0,
                "retain":true,
                "payload":"${OUTPUTS/1/STATE}",
                "events":[
                    {
                        "type":"change",
                        "source":"OUTPUTS/1/STATE"
                    }
                ]
            },
            {
                "topic":"netio/${DEVICE_NAME}/output/1/load",
                "qos":0,
                "retain":false,
                "payload":"${OUTPUTS/1/LOAD}",
                "events":[
                    {
                        "type":"timer",
                        "period":1111
                    },
                    {
                        "type":"delta",
                        "source":"OUTPUTS/1/LOAD",
                        "delta":1
                    }
                ]
            }
Messages can be sent with the following values:
- OUTPUTS/X/VOLTAGE" [V]
- OUTPUTS/X/CURRENT" [mA]
- OUTPUTS/X/POWER_FACTOR [1]
- OUTPUTS/X/LOAD mW
- OUTPUTS/X/STATE [1]
- OUTPUTS/X/ACTION
- OUTPUTS/X/DELAY unsigned int [ms]
- OUTPUTS/X/NAME [string]
- OUTPUTS/X/FREQUENCY [Hz] two decimals
- OUTPUTS/X/ENERGY [Wh]
- OUTPUTS/X/ENERGY_START [epoch]
- OUTPUTS/X/ENERGY_START_FMT [YYYY-MM-DD]
For more information about configuring the Publish section in MQTT-flex, see:
https://wiki.netio-products.com/index.php?title=MQTT-flex#Publish
Configuring MQTT-flex at your NETIO device
Step 1) Log in to the web administration of your NETIO device.
The device name is in the top left corner (see the figure).
This example uses “NETIO-AN40”. The device name is configured in SETTINGS > SYSTEM > DEVICE NAME. Find out the name of your device.
Your device will have a different name; however, with the “DEVICE_NAME” variable in the MQTT-flex config, the correct name will be used to identify your device. In a similar way, the unique MAC address can be used by means of the “DEVICE_MAC” variable in the MQTT-flex configuration.
Note:
Throughout the example, replace “NETIO-AN40” with the actual name of your device.

Step 2) Go to the M2M Protocols tab and enable the MQTT-flex protocol.

Step 3) Copy the following configuration script to the “MQTT-flex config” text area and click Save Changes.
{
    "config":{
        "broker":{
            "url":"broker.hivemq.com",
            "protocol":"mqtt",
            "port":1883,
            "ssl":false,
            "type":"generic",
            "username":"freedom",
            "password":"peace|LOVE|empathy4ALL"
        },
        "subscribe":[
            {
                "topic":"netio/${DEVICE_NAME}/output/1/action",
                "qos":0,
                "target":"OUTPUTS/1/ACTION",
                "action":"${payload}"
            }
        ],
        "publish":[
            {
                "topic":"netio/${DEVICE_NAME}/output/1/state",
                "qos":0,
                "retain":true,
                "payload":"${OUTPUTS/1/STATE}",
                "events":[
                    {
                        "type":"change",
                        "source":"OUTPUTS/1/STATE"
                    }
                ]
            },
            {
                "topic":"netio/${DEVICE_NAME}/output/1/load",
                "qos":0,
                "retain":false,
                "payload":"${OUTPUTS/1/LOAD}",
                "events":[
                    {
                        "type":"timer",
                        "period":1111
                    },
                    {
                        "type":"delta",
                        "source":"OUTPUTS/1/LOAD",
                        "delta":1
                    }
                ]
            }
        ]
    }
}
Copy the following configuration script to the “MQTT-flex config” text area and click Save Changes.

Step 4) If everything went well, you should see a green “Saved” message indicating that the settings have been stored in the device memory.

Step 5) Successful connection to the broker can be also verified by looking into the logs of your NETIO PowerCable MQTT 101x smart WiFi socket. At least the following messages indicating a successful connection should be present:
Client connected – indicates that the smart socket device is connected over the Internet to the HiveMQ server hosting the MQTT broker.
Subscribed XYZ – indicates a successful subscription to the MQTT broker.
The “action” topic can be used to control the socket, as shown later.
Published netio/${DEVICE_NAME}/output1/state – indicates that the PowerCable has sent a message with the current device state to the netio/${DEVICE_NAME}/output1/state topic.

Connecting your NETIO device to the public HiveMQ MQTT broker using MQTT-flex
HiveMQ Websocket Client (displaying messages)
Step 1) After connecting your smart socket device to the MQTT broker, open the following address:
http://www.hivemq.com/demos/websocket-client/
Step 2) From the previously-entered MQTT settings, copy the username (in this example “freedom”) to the Username field, copy the Password, and leave the remaining fields blank.


Step 3) Click Connect.
If the login credentials are correct, you should see the indication of a successful connection.

Step 4) Using the Websocket client web interface, verify that HiveMQ is receiving messages from the connected PowerCable MQTT.
Add the “Subscription” to see the messages from the NETIO device.

Step 5) In the Topic field, enter netio/NETIO-AN40/#.
NETIO-AN40 is the device name used in this example.
Your device will most likely have a different name. See step 1 (the name of your NETIO device is displayed in its web administration in the top left corner, under the green “PowerCable MQTT” model name).
Where did “netio/NETIO-AN40/#” come from?
HiveMQ displays messages defined by a topic. The topic where a device publishes messages is defined in the MQTT-flex configuration in the device (“Publish” section).
The configuration shown here reacts to messages published as:
"netio/${DEVICE_NAME}/output/1/state" with the current state of the output ("payload":"${OUTPUTS/1/STATE}")
"publish":[
            {
                "topic":"netio/${DEVICE_NAME}/output/1/state",
                "qos":0,
                "retain":true,
                "payload":"${OUTPUTS/1/STATE}",
                "events":[
                    {
                        "type":"change",
                        "source":"OUTPUTS/1/STATE"
                    }
                ]
            }
wildcard – explanation
In subscriptions, wildcards (“#”) can be used in the topic. Entering netio/NETIO-AN40/# means subscribing to all topics from the NETIO device that begin with “netio/NETIO-AN40/”.
In the settings used in AN40, there are two topics – “load” (power [mW]) and “status” (state of the output – 1 or 0).
Step 6) Click Subscribe.
If the MQTT broker is receiving messages (it is running and correctly configured), some messages will appear.
There should be at least a message with the most recent state (1 or 0). If an appliance is connected (e.g. a lamp), a message is also sent to the MQTT broker whenever there is a change in the power consumption (lamp turned on or off). These messages can be seen in the Websocket client.
HiveMQ Websocket Client (controlling the output)
To change the state of the PowerCable output, you can publish this topic: netio/NETIO-AN40/output/1/action and put the value of 4 (Toggle) into the Message section.
0 = Output switched off (Off)
1 = Output switched on (On)
2 = Output switched off for a short time (Short OFF) – device restart
3 = Output switched on for a short time (Short ON)
4 = Output switched from one state to the other (Toggle)
5 = Output state unchanged (no change)

Click “Publish” to send the command to toggle the output (230V output power socket of your NETIO PowerCable MQTT).
When the message is published, the device toggles its output and publishes a message about the state change (MQTT-flex configuration – “publish” section – “events” – “type”:“change”).

Controlling the NETIO device with a mobile app over the MQTT protocol
To control NETIO smart socket devices over MQTT, we recommend the following apps:
- Android - MQTT Dash https://play.google.com/store/apps/details?id=net.routix.mqttdash
- Apple iOS – MQTTool https://apps.apple.com/us/app/mqttool/id1085976398
In this example, MQTT Dash is used.
Adding the MQTT broker
This is the default screen when the application starts for the first time.
Step 1) Tap the indicated icon in the top right corner to add a new MQTT broker.

Step 2) Enter the HiveMQ broker details.

Step 3) Tap the indicated icon in the top right corner to save the settings.

Step 4) The broker is now added.

Step 5) Now tap the broker to add control elements.
Adding control elements
Step 6) Tap the indicated icon in the top right corner.

Step 7) A selection of available control elements appears. As an example, we will use a Switch/button.

Step 8) Configure the Switch/button element.
When adding a Switch/button element, all that is needed is the element name and the topic for publishing messages.
E.g. netio/NETIO-AN40/output/1/action
For more information about possible topics and NETIO MQTT-flex in general, see: https://wiki.netio-products.com/index.php?title=MQTT-flex


Step 9) Save the settings again.
After saving, the control element block is added.

This is it. As simple as this.
In the end, the application screen may look like this:

FAQ
1) What should I do when HiveMQ is offline?
Wait a moment. HiveMQ is a free service, so interruptions may happen. However, they do not last long. Simply wait a moment until the service comes back online.
2) What should I do when I need an app for Apple iOS?
For Apple iOS users, we recommend the MQTTool app. We tested it and it works similarly to the described Android app.
3) I am connected in the HiveMQ websocket client. However, whenever I try to Subscribe, the websocket disconnects me.
The Subscribe topic format is incorrect.
Use the correct format: netio/{DEVICE_NAME}/#
4) PowerCable does not allow me to save the MQTT-flex configuration.
The configuration format is incorrect. Make sure that the configuration is correctly copied/entered.
5) Is it possible to use MQTT-flex configuration in NETIO 4x products (NETIO 4All / NETIO 4 / PowerPDU 4C)?
Support is planned but at the time of this writing (September 2019), it is not implemented yet.
6) Is it possible to publish electrical measurement data only once in a while?
Yes, it is possible to combine the actions offered by NETIO MQTT-flex: change, delta, timer.
7) Is it possible to create a format compatible with the standard NETIO MQTT in MQTT-flex?
The standard NETIO M2M MQTT uses a JSON payload. For NETIO-flex, this function will be added by the end of 2019.
8) Can a NETIO device send / receive messages for several topics at the same time using MQTT-flex?
Yes, for a single MQTT broker, multiple publish and subscribe topics can be specified in the “publish” and “subscribe” sections.
9) Is it possible to connect several NETIO devices together using MQTT-flex?
Yes. When using the same broker, it is possible to set up a scenario where device B maintains its output in the same state as device A.
Supported versions of PowerCable MQTT FW:
2.0.2 and higher (Firmware archive)
Supported devices:
- PowerBOX 3Px
- PowerPDU 4PS
- PowerDIN 4Pz
- PowerCable MQTT 101x