
Supported devices: NETIO 4All, NETIO 4, PowerCable Modbus 101x, PowerBOX 3Px, PowerPDU 4C, PowerPDU 4PS, PowerDIN 4Pz, PowerBOX 4Kx, PowerPDU 8QS
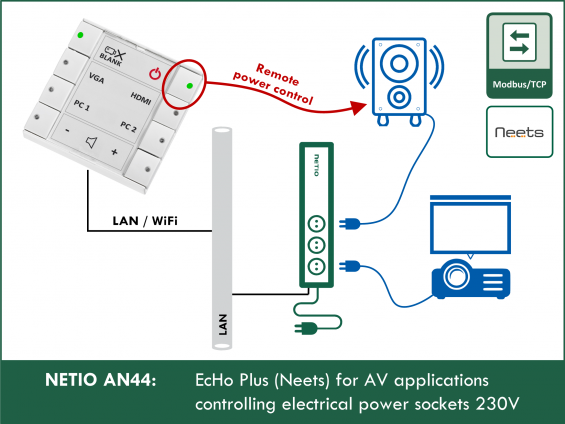
NETIO AN44 Application Note shows an example of Neets Project using Neets EcHo Plus and NETIO smart sockets. It covers NETIO device configuration and Neets
AN44 project shows:
- Power outlet control by button on the EcHo Plus (Toggle output, Turn on, Off),
- LED indication of power output status (on/off) by LED in the button
- LED blinking indication of exceeded (current) threshold.
The NETIO smart sockets and Neets Control System use Modbus/TCP protocol. Device drivers for NETIO devices are available in Neets Project Designer.

Neets EcHo Plus
- Recommended 3rd party device
- Manufacturer: Neets A/S (Denmark)
-
Product: Neets EcHo Plus
Neets Control – EcHo Plus is designed to provide uniform AV control interface in all rooms through an 8-Button Keypad with built-in controller. - Software: Neets Project Designer – Windows tool for easy configuration

You can do with Neets & NETIO power sockets together
- Switch On or Off any power socket output by the button.
- Toggle state of any power socket output by the button.
- Initiate reset sequence (Short Off) on defined power output by the button.
-
Show output state by LED in the button.
- Define PowerUp sequence / delay (by NETIO PowerUp delays + PowerUp State).
- Indicate minimal / maximal power (W) or current (mA) consumption on defined output by LED blinking. Require NETIO device with power metering.
Compatible Neets devices
Compatible NETIO devices
- NETIO PowerBOX 3Px
- NETIO 4
- NETIO 4All
-
NETIO PowerCable Modbus 101x
- NETIO PowerPDU 4C
- NETIO PowerPDU 4PS
- NETIO PowerDIN 4PZ
Download Installation Guides and Examples for Neets EcHo Plus
Guides – describe the detail configuration and includes:
- Config for specific NETIO devices
- Discovering them on the network
- Neets Project Designer – basic project setup
Examples for Neets Project Designer
- Example projects for different NETIO devices
The key configuration of NETIO device – Modbus/TCP
NETIO device web administration: Enable protocol Modbus/TCP
- LEFT MENU: - M2M API Protocols
- Check „Enable Modbus/TCP” and check Port (default 502)
- Save Changes

Neets Project Designer – System
Add NETIO device in the System view
- Window “Devices” - Navigate to Others / NETIO Products
- Drag&drop device “PowerPDU 4C” to window “Connection diagram for EcHo Plus”
The “PowerPDU 4C” device can be used to control NETIO 4 and NETIO 4all.
-
Click on “PowerPDU 4C” and enter IP address and Port in “LAN Settings”
(in our example 192.168.17.104 and port 502)

Neets Project Designer – Interface
Interface view - description/labels of buttons on the Neets EcHo Plus keypad.
We use following descriptions in our example
- O1 – O4: number of power outlet on the NETIO device
- Toggle: change a power outlet state of the corresponding outlet
- Restart: Short Off – turns the corresponding power outlet off and then on after defined period. This period can be defined in a NETIO device web administration for each output independently.

Neets Project Designer – Functions
Function view – configuration of the button’s function/action
Sequences – NETIO device drivers includes following Control actions:
x to be replaced by power outlet number (1 – 4 depending on NETIO device type)
- Output x = Off: Output switched OFF
- Output x = On: Output switched ON
- Output x = Short Off pulse (restart): Output switched OFF for a short time
- Output x = Short On pulse: Output switched ON for a short time
- Output x = Toggle: Output switched from one state to the other
Native keypad – assign control actions chosen from Sequences for keypad buttons
- Drag & drop control sequence to the desired button
- Our example use “Output 1 = Toggle” on the top left button and “Output 1 = Short Off pulse (restart)” on the top right button etc.
Actions – configuration of used control sequence for specific button
- Details about control sequence
- Configuration of “Wait” time – the buttons remain “inactive” for this period since the button is pressed. The value “0” can be used as a default.

Neets Project Designer – Feedback
Feedback view – configuration of LED indication based on power outlet state and power consumption.
Conditions – select your NETIO device and click “+ Add conditions”
 - add condition")
Conditions predefined for NETIO devices:
x to be replaced by power outlet number (1 – 4 depending on NETIO device type)
- Output x state: ON/OFF state of power outlet
- Output x Current [mA]: instantaneous Current in miliAmpers supplied by power outlet
- Output x Power [W]: instantaneous el. Power in Watts supplied by power outlet
Note: Current and Power conditions are available only if NETIO device supports metering.
The values are read by Neets EcHo Plus (or other Neets control device) from NETIO device periodically. The read interval could be changed in Neets Device Editor and default values are:
- State – every 1 second
- Current and Power – every 5 seconds

Based on selected Condition chose logical/mathematical operator, condition reply value and action – Drag&Drop “Change button appearance”


Do not forget define condition for “both state/value changes” e.g.:
- If Output 1 State = Output 1 ON THEN LED light On
- If Output 1 State = Output 1 OFF THEN LED light Off
- Output 1 Current [mA] > 111 THEN LED light Fast blink
- Output 1 Current [mA] < 111 THEN LED light Off
FAQ
1) Can I use hostname instead of an IP address for NETIO device in the Neets Project Designer?
No, you can address a NETIO device only by an IP address.
2) Is it possible to secure connection between Neets EcHo Plus and NETIO device?
Somehow. You can define allowed IP address range from what NETIO device accepts Modbus/TCP connection. Set it up at NETIO device web administration M2M API Protocols / Modbus/TCP /Enable IP filter. Use the same IP address if this is only one allowed.
3) How can I use NETIO 4 and NETIO 4All devices with Neets?
Yes. Use the “NETIO PowerPDU 4C” device driver in Neets Project Designer.
4) Can I use NETIO PowerCable REST or MQTT with Neets?
No, because these devices do not support Modbus/TCP protocol.
5) Can I use NETIO Cloud in parallel to Neets control?
Yes, NETIO Cloud works in parallel to Modbus/TCP protocol.
6) Can I us NETIO Mobile app in parallel to Neets control?
Yes, NETIO Mobile app works in parallel to Modbus/TCP protocol.
Supported FW versions for NETIO devices
- PowerPDU 4C: firmware 3.3.1 and later
- PowerPDU 4PS: firmware 2.4.4 and later
- PowerBOX 3Px: firmware 2.4.4 and later
- PowerCable Modbus 101x: firmware 2.3.9 and later
- NETIO 4 and NETIO 4All: firmware 3.3.1 and later
Download all related documents