
Supported devices: NETIO 4All, NETIO PowerPDU 4C, NETIO 4
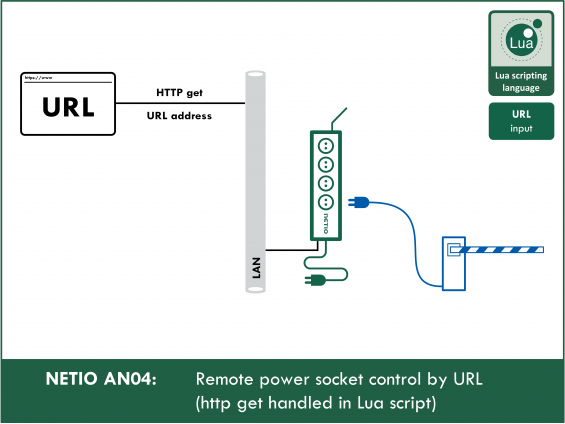
NETIO sockets can be controlled with "URL API" calls (accessing a URL with parameters) in two ways:
- Using a custom Lua script (described in this AN04)
- Using the standard M2M API (described in NETIO AN19)
The difference in the methods described in AN04 and AN19 is that the standard M2M API (AN19) cannot be modified by the user. With a custom Lua script that runs in the NETIO smart sockets device (described in this AN04), the socket behavior as well as the control parameters can be freely modified.
However, the Lua script must be uploaded to the device, configured and run, while the standard M2M API is active as soon as it is enabled in the web administration.
---
The script is started after every http get request. That is, whenever the NETIO IP address with “event” after the last slash (<NETIO_IP>/event) is invoked. The arguments to be processed by the Lua script follow after a question mark and are separated with the “&” sign.
The control mechanism is based on HTTP (HTTPs) requests linked to custom actions in the Lua script.
To ensure at least a basic level of security, the command should include a password. In this example, the password is “mickeymouse”.
To demonstrate the advanced possibilities of a custom Lua script, the blink action toggles a specified output according to the “counter” variable.
For quick and user-friendly control of NETIO smart sockets, it is possible to create executable scripts on the desktop or bookmarks/buttons in the web browser that directly perform the programmed action on NETIO4 by sending the corresponding HTTP request.
Creating the rule
To create and run the Lua script, do the following:
1) In the Actions section of NETIO 4 web administration, click Create Rule to add a rule.

2) Fill in the following parametres:
- Enabled: Checked
- Name: HTTP control (user-defined)
- Description: Allow control of outputs via web browser (user-defined)
- Trigger: Incoming URL API request
- Schedule: Always
3) In the field for the Lua script, enter the following code:
------------Section 1------------
local myPassword = "mickeymouse"
---------End of Section 1---------

local password = event.args.password
local action = event.args.action
local output = tonumber(event.args.output)
local actionDelay = tonumber(event.args.delay)
local counter = tonumber(event.args.counter)

local state = false -- inner variable

function blink()
  state = not state
  if counter > 0 then
    devices.system.SetOut{output=output,value=state}
    counter = counter - 1
    delay(actionDelay,function() blink() end)
  end
end

if password ~= myPassword then
  logf("Invalid password for %s output %d", action, output)
  return
end

-- log what is going to happen
logf("Going to %s output %d", action, output)

if action == "on" then -- turn on output
  devices.system.SetOut{output=output, value=true}
elseif action == "off" then -- turn off output
  devices.system.SetOut{output=output, value=false}
elseif action == "reset" then -- cycle power
  if actionDelay == nil then
    devices.system.ResetOut{output=output}
  else
    logf("%d", actionDelay)
    devices.system.ResetOut{output=output,resetDelay=actionDelay*1000}
  end
elseif action == "toggle" then -- switch output state
  if devices.system["output" ..output.. "_state"] == 'on' then
    devices.system.SetOut{output=output,value=false}
  else
    devices.system.SetOut{output=output, value=true}
  end
elseif action == "blink" then -- turn off output
  if devices.system["output" ..output.. "_state"] == 'on' then
	state = true
  else
	state = false
  end
  if actionDelay == nil then
    actionDelay = 1
  end
  blink()
else -- by default do nothing
  logf("Invalid action: %s", action)
end
4) To finish creating the rule, click Create Rule at the bottom of the screen.

Composing the command
-
URL: http:// 192.168.101.118//event?password=mickeymouse&action=on&output=4
- Replace the IP in the example with the IP of your NETIO device
-
Specifying the action:
- Turn a socket on: action=on
- Turn a socket off: action=off
- Power-cycle a socket: action=reset
- Toggle a socket: action=toggle
- Blink with a socket: action=blink
-
Socket numbers:
- Sockets no. 1: output=1
- Sockets no. 2: output=2
- Sockets no. 3:: output=3
- Sockets no. 4: output=4
-
Delay for power-cycling or state switching:
- E.g. 5 seconds: delay=5
-
Number of toggles:
- E.g. toggle 10 times: counter=10
-
Examples of URL addresses:
- Turn on output no.1: http:// 192.168.101.118//event?password=mickeymouse&action=on&output=1
- Turn off output no.2: http:// 192.168.101.118//event?password=mickeymouse&action=off&output=2
- Restart (power-cycle) output no.3: http:// 192.168.101.118//event?password=mickeymouse&action=reset&output=3
- Power-cycle output no. 3 with delay of 20 seconds: http:// 192.168.101.118//event?password=mickeymouse&action=reset&output=3&delay=20
- Toggle output no.4: http:// 192.168.101.118//event?password=mickeymouse&action=toggle&output=4
- Toggle 10 times output no.2, interval of 5 seconds between changes: http:// 192.168.101.118//event?password=mickeymouse&action=blink&output=2&delay=5&counter=10
Important note: To prevent unauthorized people from controlling your sockets, remember to change the password (in the Lua script as well as in the links) from “mickeymouse” to something secret!
Creating the Lua script
- The script is started every time your NETIO device receives a URL request.
- First, the script parses the parameter string, sets the values of the respective variables, and then performs the operation with the selected output.
Variables
- Variables used in the script are: myPassword, password, action, output, actionDelay, counter.
- Since they are not global variables, they are all declared using the local keyword.
- The value of the myPassword variable is set by the user; other variables are set according to the parameters in the invoked URL. Their values are obtained using “event.args.” with a URL parameter name after the dot (e.g. local password = event.args.password).
- The actionDelay variable is set according to the delay parameter. The variable cannot be named delay because this is a reserved name of a system function.
- Variables that are treated as numbers (output, actionDelay, counter) are cast to numbers with the tonumber() statement already at their declaration.
-
Význam proměnných je následující:
-
myPassword
- Specifies the required password
- This is the only user-defined variable in the Lua script (the other values are parsed from the URL parameters).
- It is a text string, so it has to be enclosed in double quotes.
- As an example, to use “netioURL987” as the password: local myPassword = "netioURL987"
- The value is case-sensitive
-
password
- Authenticates the originator of the URL request
-
action
- Selects the action (see below)
-
output
- Number of the socket on which the selected action should be performed
-
actionDelay
- If the action is reset, specifies the delay before the output is switched on. If it is not specified, the output is turned on after the delay configured for that particular socket (the default is 5 seconds).
- If the action is blink, specifies the delay before the state is toggled. If it is not specified, the value is set to 1 second
-
counter
- Number of toggles for the blink action
-
myPassword
- The script also contains a variable called state, which keeps the output state for the blink action
Password check
if password ~= myPassword then
  logf("Invalid password for %s output %d", action, output)
  return
end
- First of all, the script compares the password variable with the password specified in the myPassword variable. The condition is if password ~= myPassword then (the ~= symbol means “not equal to”). If the condition is true, therefore the passwords don’t match, the script logs the attempt using the logf() function and terminates with the return statement.
- If the condition is false, the script continues.
Selecting the action
- When the passwords match, the script logs the action to be performed and then looks at the action variable to decide what to do next. To do that, it uses multiple conditions to determine the action (on, off, reset, toggle, blink). If the action is none of the above, the script logs an “Invalid action:” message followed by the contents of the action variable.
-
action == 'on'
- Action to switch the output on
- The statement to switch the output on is: devices.system.SetOut{output=output, value=true}
-
action == 'off'
- Action to switch the output off
- The corresponding statement is devices.system.SetOut{output=output, value=false}
-
action == 'reset'
- Action to power-cycle the output.
- The script checks whether the delay parameter is specified; the condition is if actionDelay == nil then.
- If not (the condition is true), the output is power-cycled with the devices.system.ResetOut{output=output} command. The output is turned on after a “Switch delay” that is configurable for each output in the web administration.
- If the delay parameter is specified, the delay is set to the value of that parameter multiplied by 1000 (to obtain a value in milliseconds). In this case, the command is devices.system.ResetOut{output=output, resetDelay=actionDelay*1000}
-
action == 'toggle'
- Action to toggle the output state.
- First, the condition if devices.system["output" ..output.. "_state"] == 'on' then checks whether the output is on.
- If it is on, it is switched off with the devices.system.SetOut{output=output, value=false} command.
- If it is off, it is turned on with the devices.system.SetOut{output=output, value=true} command
-
action == 'blink'
- Action to repeatedly toggle the output state.
- First, the script stores the current state of the selected output into the state variable using the following condition:
if devices.system["output" ..output.. "_state"] == 'on' then
  state = true
else
  state = false
end
- Then, the script checks whether the delay parameter is specified; the condition is if actionDelay == nil then. If it is not specified (the condition is true), its value is set to 1 second.
- Finally, the blink function is called to take care of the toggling.
blink function
function blink()
  state = not state
  if counter > 0 then
    devices.system.SetOut{output=output,value=state}
    counter = counter - 1
    delay(actionDelay,function() blink() end)
  end
end
- The function first toggles the state variable (to the opposite state with respect to the output) using the state = not state negation.
- Then it checks whether the output should be toggled using the if counter > 0 then condition. In that case (counter variable is greater than 0), the output state is changed to the opposite one using devices.system.SetOut{output=output,value=state} and the counter variable is decremented (counter = counter - 1).
- Finally, the function is called again using the delay function, with a delay specified in the actionDelay variable: delay(actionDelay,function() blink() end).
- If the counter parameter is not specified, the output is not toggled at all.
Controlling the sockets from a web browser
According to the instructions above, compose a control command and enter it in a web browser. If your NETIO device accepts the URL request, a page with an “OK” appears in your browser.

Eventually, it will be possible to change the default “OK” response to a user-defined string. At the moment, in FW 3.0.1, it is not possible.
Most browsers allow creating bookmarks with URLs for faster control. As an example, the picture shows bookmarks for turning a socket on and off and for toggling its state with a single click.

Controlling the socket from the command line
For command line control, a utility such as cURL (available for download from http://curl.haxx.se/download.html) or any other command that can access a URL (such as a web browser) can be used.

Windows
Download the cURL utility, open the command line (CMD) and go to the bin folder in the curl installation folder.
The command string needs to be enclosed in double quotes and preceded with curl.
Example - turn on socket no. 1: curl "http:// 192.168.101.118//event?password=mickeymouse&action=on&output=1"
Mac OS X a Linux
By default, cURL is installed in your operating system. The command to control the outputs is the same as in Windows, see above.
HTTPs security
For secure connections, https can be enabled.
To do that, enable the Turn on secure connection (HTTPS) option in the Settings/Secure Connection menu. Click Save Changes to save the settings.
Activating https can take some time.
It is possible to change the HTTPS port from the default 443 to another one of your choice. However, in that case the port number must be specified after the IP address and a colon (e.g. for port 400: https:// 192.168.101.118:400/)
")
FAQ:
1) Does URL control work over WiFi?
Yes. It does not matter whether you connect to the network via LAN or WiFi.
2) Is it possible to read the output states using http GET?
No. We recommend using Telnet or XML-based protocols of the M2M API.
3) Can I customize the URL format?
Yes, everything after http:// 192.168.101.118/event? can be configured in the Lua script. Parameter names can be changed and further conditions added as needed.
4) I turn on the socket using URL but then the Scheduler is supposed to control the same socket. Will the time sequence work as expected?
Yes, after executing a URL command, the socket can still be controlled via all other channels (Scheduler, WatchDog, mobile app, button, ...)
5) Is it possible to restrict access to the Lua script to a single IP only? Like an IP filter?
No. The Lua script cannot determine the IP address from where the http get request originated.
6) Which method is used in the URL based control, http post or http get?
It is the http get method.
7) Is it possible to control several sockets with a single command?
No. Unlike in AN19, several commands need to be used.
8) What is the difference between AN04 and AN19?
The AN19 Application Note uses a standard M2M API. AN04 uses a Lua script which makes it possible to customize the parameters.
More about Lua:
This Application Note is compatible with:

|
NETIO 4NETIO 4 is smart power socket (smart power strip) with four 230V/8A sockets, connected to LAN and WiFi. Each of the four power sockets can be individually switched on/off using various M2M API protocols. NETIO 4 is a unique product designed for IT, industry, smart homes, multimedia installations and other applications. Use the product whenever you need 230V sockets controlled by a mobile app, by a computer program (via M2M API) or by a custom script (Lua), and featuring a timer (Scheduler) or auto reboot functionality (IP WatchDog).
|

|
NETIO 4AllNETIO 4All is a PDU module featuring four 230V/8A power sockets with consumption metering for each socket as well as LAN and WiFi connectivity. Each of the four sockets can be individually switched on/off over the Web or using various M2M API protocols. Electricity consumption (A, W, kWh) can be measured at each power socket. NETIO 4All smart sockets are designed for remote measurement and control of electrical sockets. Use the product whenever you need 230V sockets controlled by a mobile app, by a computer program (via M2M API) or by a custom script (Lua) that runs directly in the NETIO 4All smart socket device. |

|
NETIO PowerPDU 4CNETIO PowerPDU 4C is a small 110/230V PDU (Power Distribution Unit). Each of the four IEC-320 C13 outlets can be independently controlled (On / Off / Reset / Toggle). Electrical parameters (A, W, kWh, TPF, V, Hz) are measured with high accuracy at each outlet. The device features two LAN ports (and a built-in Ethernet switch) for connecting to a LAN. Each power output supports ZCS (Zero Current Switching) to protect the connected equipment. |