
Supported devices: NETIO 4All, PowerPDU 4C, NETIO 4, PowerCable REST, PowerBOX 3Px, PowerPDU 4PS, PowerDIN 4Pz, PowerBOX 4Kx, PowerPDU 8QS
Advantages of the JSON protocol:
- The JSON file structure is easy to understand and there are numerous tools to work with JSON.
- With https, the communication can be secured in a standard way.
- Transfer over http at the default port 80 makes the JSON over http(s) M2M API protocol the least susceptible to problems with firewalls and security restrictions in large enterprises.
- The control is bidirectional (READ = consumption metering, WRITE = switching on/off). Using http get, the /netio.json file with the overall status of the device and the states of individual outputs (sockets) can be downloaded. The outputs can be controlled by uploading into /netio.json using http post.
- User-friendly reading of the status (a simple click to view in the browser). To upload .json files to the device, NETIO provides the HTTP(s) file upload function. It allows easy uploading of 3 .xml or .json files prepared in advance.
How does the NETIO REST JSON http(s) protocol work
1) In the web administration, enable M2M API Protocols – JSON API and leave the READ-ONLY access without a password. If the option was disabled before, save the changes (the device restarts).

2) The device state (sockets ON/OFF + electricity consumption) can be read as the /netio.json file at the device’s IP address. The netio.json file can be downloaded over http(s) and displayed in the browser just as a usual web page.
NETIO online demos
a. http://netio-4c.netio-products.com
b. http://netio-4all.netio-products.com
3) Outputs are controlled over the JSON protocol by uploading the netio.json file to the device using http(s) post. It is advisable to protect the file upload feature with a password. The “netio.json” file must have the correct format.
4) Files can be uploaded using a variety of tools and utilities. To make things simple, NETIO users can use our HTTP(s) file upload tool, available directly in the device’s web interface.
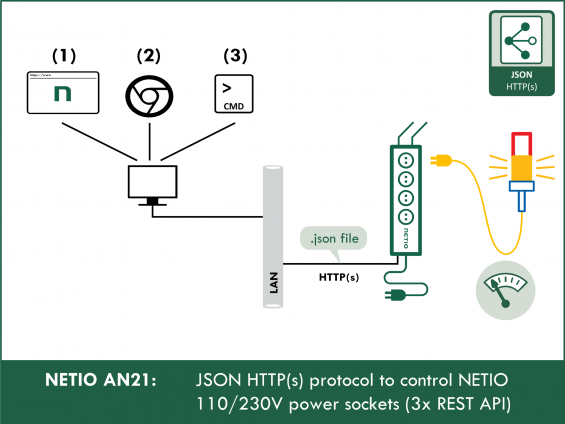
5) NETIO AN21 demonstrates the transfer of the netio.json text file over http(s) in 3 different ways:
6) In our implementation of the REST JSON protocol, the same TCP/IP connection to the http server in the device can be used to write to the device and then verify the new state. The controlling side uploads the netio.json file (http post) and, after the action is performed (e.g. an output toggled), receives an updated netio.json file to verify the result.
For a detailed description of the NETIO REST JSON protocol structure, see the M2M REST JSON documentation.
NETIO REST JSON http(s) protocol
The current state of each output at the moment of reading (0 / 1) is contained in the netio.json file in the State variable. The variable in the State tag can be read as well as written.
If the State variable is used for writing (to control the output), the Action variable must be either left out or set to Action = 6.
Action
To briefly switch the output off (Short Off) or to flip it from one state to the other (Toggle), the Action variable can be used for each output instead of the State variable.
The Action variable is write-only; when read, the value is always 6. If the Action variable in the uploaded netio.json file is set to a value different than 6, it takes precedence, and the value in the State variable is ignored.
Action values:
- 0 = Output switched off (Off)
- 1 = Output switched on (On)
- 2 = Output switched off for a short time (short Off / restart)
- 3 = Output switched on for a short time (short On)
- 4 = Output switched from one state to the other (toggle)
- 5 = Output state unchanged (no change)
- 6 = Ignored (use State to set the state)
| The output reacts to the Action tag | The output reacts to the State tag |
{
 "Outputs":  [ {
 "ID":  1,
 "Action":  1
 } ]
}
|
{
 "Outputs":  [ {
 "ID":  1,
 "State":1,
 "Action":  6
 } ]
}
|
Configuring NETIO 4x
In the M2M API Protocols -> JSON API section of the NETIO 4x device’s web interface, enable URL JSON API.
Set the Username and Password for READ-WRITE access.
READ-WRITE credentials allow both reading and writing.
Click Save Changes. After saving the changes, the device restarts (about 1 minute).


NETIO 4All Online demo
The online demo is a physical NETIO device connected to the Internet at a public IP address. The manufacturer makes available a demo device of each model. The online demos have different configurations, so it is possible to test the behavior without having the devices physically in hand.
In the online demos, configuration changes cannot be saved.
To access the online demo of a product, click “TRY ON-LINE DEMO” at the respective product page.
AN21a: Device HTTP(s) File Upload
JSON file-based control can be easily tested directly in the web interface of the product, using the “DEVICE HTTP(S) FILE UPLOAD” tool for uploading text files to the device.
Open the web interface of your NETIO 4x device.
Go to M2M API Protocols -> JSON API
Enable the JSON API protocol, and optionally set a password and the port.
At the bottom of the page, ready-made .json files for controlling the NETIO 4x device can be downloaded to your computer.
Click Upload JSON file to the device

HTTP(s) File Upload opens.
 netio.json file upload to NETIO power socket")
Click Choose file. The Windows Explorer opens.
Browse to the .json file that you have downloaded or created.
Up to 3 netio.json files to control your NETIO 4x smart sockets can be uploaded in one go.
Note that regardless of the source file name, the structure is always uploaded as /netio.json.

Select the file to upload to the device.
Click Send file.
 file upload to NETIO power socket")
After the upload, the HTTP server response is displayed. lf everything was OK, the netio.json file with the device state is shown. In case of a problem, an error message with the details about the error appears
 file upload")
AN21b: Advanced REST Client (ARC)
Available for download here: https://chrome.google.com/webstore/detail/advanced-rest-client/hgmloofddffdnphfgcellkdfbfbjeloo
Advanced REST client is a Chrome extension to send custom HTTP requests. It can be used to upload .json or .xml files to NETIO smart power outlet devices.

If a password is set in your NETIO 4x device, the authorization header needs to be added.


Click SEND. Advanced REST client displays the response from your NETIO 4x device. If everything is OK, the response will consist of 200 OK and a netio.json file containing the state of the NETIO 4x device.
In case of a problem, an error message with a return value identifying the problem is shown.
Return values
The HTTP server status response to the JSON get/post request can be any of the following:
- 200 OK - Everything went OK.
- 400 Bad request - Syntax error in the request.
- 401 Unauthorized - Incorrect username or password.
- 403 Forbidden - JSON API is disabled in the NETIO device (see Configuring NETIO 4x) or is read-only (and a write access was attempted).
- 500 Internal Server Error - Internal server error, or the server has not started yet (e.g. after a restart).

AN21c: cURL
Available for download here: https://curl.haxx.se/download.html
After unzipping, the curl tool can be run from any directory. It does not have to be in a system directory.
cURL is a command-line tool to transfer data using URLs.
Version used: curl 7.55.1 (Windows) libcurl/7.55.1 WinSSL
curl -u netio:netio -d "{\"Outputs\":[{\"ID\":1,\"Action\":4}]}" -H "Content-Type: application/json" -X POST http:// 192.168.101.181:80/netio.json
A curl command consists of several parts: curl authorization JSON -H "Content-Type: application/json URL
If everything is OK, the server should send a response to that effect in the form of a JSON file with the NETIO 4x device state.

In case of a problem, an error message with a return value identifying the problem is shown.
Return values
The HTTP server status response to the JSON get/post request can be any of the following:
- 200 OK - Everything went OK.
- 400 Bad request - Syntax error in the request.
- 401 Unauthorized - Incorrect username or password.
- 403 Forbidden - JSON API is disabled in the NETIO device (see Configuring NETIO 4x) or is read-only (and a write access was attempted).
- 500 Internal Server Error - Internal server error, or the server has not started yet (e.g. after a restart).
cURL authorization
-u username:password
-u netio:netio
If a password is not used, this entire part can be left out.
cURL data
-d ‘{“JSON”}’
-d "{\"Outputs\":[{\"ID\":1,\"Action\":4}]}"
CAUTION! When using Windows, special characters in the JSON structure must be escaped with backslashes (\) - see the figure.

In Windows, the curl command would look like this:
curl -u netio:netio -d "{\"Outputs\":[{\"ID\":1,\"Action\":4}]}" -H "Content-Type: application/json" -X POST http:// 192.168.101.181:80/netio.json
In other operating systems, the command may look like this:
curl -u netio:netio -d '{"Outputs":[{"ID":1,"Action":4}]}' -H "Content-Type: application/json" -X POST http:// 192.168.101.181:80/netio.json
cURL URL
-X POST your IP address/netio.json
-X POST http:// 192.168.101.181:80/netio.json
FAQ
1) Is it possible to use the IP address of an online demo?
Yes, to try this out, the IP address of a NETIO online demo can be used. To find the IP addresses, see the individual product pages.
2) Is it possible to control a different output than the output No. 1?
Yes. For devices with multiple outputs, the number of the output corresponds to the ID in the JSON structure of the netio.json control file.
Example: {"Outputs":[{"ID":3,"Action":4}]}
3) How can I install cURL on my PC?
cURL can be downloaded for free at the official website.
Website: https://curl.haxx.se/download.html
4) Is it possible to install cURL in operating systems other than Windows?
Yes, cURL is commonly used for example in Unix-like systems.
5) Is it possible to use the Advanced REST client without Google Chrome ?
Yes, Advanced REST client can be downloaded as a stand-alone program. Most operating systems are supported.
Website: https://install.advancedrestclient.com/install
Supported versions for NETIO 4x
3.1.0 and higher (Firmware archive)
Supported versions of PowerCable xxx
2.0.2 and higher (Firmware archive)
Supported devices:
- NETIO 4
- NETIO 4All
- PowerPDU 4C
- PowerPDU 4PS
- PowerBOX 3Px
- PowerDIN 4Pz
- PowerCable REST 101x